rev 1/05
It's best to
send a saw out to be sharpened. But to get peak performance back right now, it's worth knowing you
can at least touch up a saw yourself in 20 minutes. Here's enough
info to get you started.
First, though, why does anyone care about sharpening a saw? In fact, most people do not. You can see cross-cut hand saws at any yard or estate sale, hanging on the wall, usually the last tool to go.
HAND SAWS CUT STRAIGHT. The advantage and beauty of a hand saw is the enormous width of the blade. The blade guides itself -- it is "self-jigging". You can cut perfectly to a straight line working freehand -- no clamps, just go. At peak performance, a cabinetmaker will razor a cutting line (pencil lines are too wide) and cut right up to the already-sliced wood fibers with 1/64th-inch precision. The other half of the story after self-alignment is sharpness -- the people who leave the used saws hanging may never have enjoyed power-cutting with a sharp saw. As with a chain saw and logs, so it is with a handsaw and carpentry framing (houses) or cabinetwork (furniture): if it makes powder, it's dull; if the sawdust is chips and shavings, it's sharp.
DIRECTORIES: Get your saws professionally done, and let's learn touch-up here. Search under "sharpening services" in a directory like superpages.com, or enter your zip code and "saw sharpening service" into Google's local directory service, then phone one of the hardware and woodworking business that come up, and just ask. Here in Virginia, I use Sure Set Saw, Inc. 1721 South Park Court, Chesapeake, VA 23320, tel 757/420-7991. Bill Fugh's Dad started the business in 1959. If you run into a nail with your best tungsten carbide table saw blade, they can perform miracles with what's left and braze in a new tooth if necessary. A hand saw is $7 (2002). Really, the biggest problem is finding the carton, not the shipping and service cost.
GLUE GUNS: good news, America. The despised Hot Glue Gun that isn't strong enough to hold anything, the glue that cools and hardens before you can get your Act (or anything else) together . . . well, that gun is dynamite for tacking cut-down cartons together. Make your own saw sharpening shipping carton and give the poor hot-stick thing something to live for. (Hot glue also repairs kids sneakers and worn running shoes, but I didn't tell you.)
GETTING STARTED: Saws, remember? Get a triangular file 5 to 7 inches long. If you have to go out and buy one, get several.

 Click any photo to enlarge.
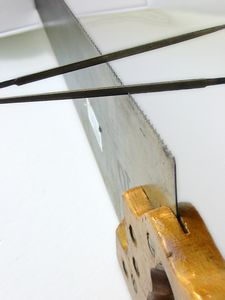
As the drawing of perfect teeth implied, the file slants across the teeth. In this photo, as with a compass needle pointing us to North, the files are resting in the teeth and freely swinging to the angle that incises those teeth into the metal.
What isn't obvious from looking at the teeth up close is that the triangle file should be held level. These two files just resting in the "front" and in a "back" valley of two teeth are **not** tilted up or down. The saw is perfectly sharpened, because I didn't do it. The files are level. If you have to tilt the file to avoid taking too much metal off the tooth, then the tooth is not set or pointed enough. It should be bent out of the way. Take a another look at the vicious points that do the power stroke in the first drawing.

The files should make a 35deg/55deg angle to the blade (35 + 55 = 90), rather than being perpendicular.
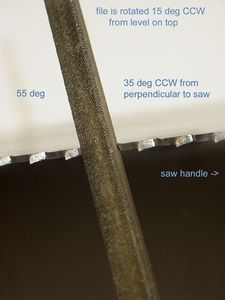
15 DEG ROTATION: Besides the 35 / 55 deg slant away from perpendicular, the file is rotated 15 deg around its own long axis, away from a perfectly symmetrical position. In other words, the top of the triangle is not level, but rotated 15 deg. This gives us that slanted saw tooth look. We get triangles with angles of 75 deg, 45 deg and 60 deg, instead of 60 deg all around (75+45+60=180; 3 x 60 = 180).
Summarizing, the file is stroked horizontally across a vertical saw, along a line of motion tilted 35 deg out of perpendicular, and rotated about 15 deg to fit the sawtooth-shaped tooth profile.
WHEN YOU NEED TO SHARPEN: The sawdust becomes a fine powder, with no chips or curls of wood. The saw sounds and feels different. If you look at the very tips of individual teeth, they are polished. We are talking about areas of metal smaller than the head of a pin here.
POLISHED MEANS DULL: Polished like a mirror means worn out; it means dull for knives, for chisels, for plane irons, for individual teeth on a file, for the edge of a hand cabinet scraper or an old-house-restoration-job paint scraper, for the tips of chain saw cutters and for the very toppy tips of individual teeth on a saw. What's going on here has a lot to do with tomatoes.
Under a scanning electron microscope, a freshly-sharpened cutting edge looks like the edge of a corrugated iron roof, but sliced off very obliquely, so that the length of the roof goes in and out, not just up and down. The corrugations -- not as regular, of coarse -- are the scratches made by the grinding wheel, the file, the honing (bench) stone, whatever was used to sharpen the tool. Provided the steel is hard and brittle enough, and provided the sharpener holds the sharpening angle absolutely constant long enough, a paper-thin edge develops (at the microscopic level, but you can sometimes see it), and ... tah-dah ... breaks off. That leaves the corrugated roof edge. This acts like a saw, and can cut tomato skin. If the knife has a completely straight edge -- any polish at all, no more in/out, up/down saw-like teeth -- the skin can bend out of the way like rubber. The only exception I know among knives are the cleaved glass and diamond knives uses to slice plastic-embedded tissue in electron-microscope labs ('"ultra-microtomes"). Any serrations would look like zebra strips in the final micrographs, so these people just push the knife through the work, and, for them Polish is Good. Woodworkers are all tomato slicers -- we almost never try to just push the cutter through the work, we draw the knife across the wood.
Religious wars in the sharpening debates break out because some few are pushers for polishing (mortise and tenon cutters, the dovetail mob) and the rest of us are slicers.
WHAT YOU NEED TO SHARPEN: File each tooth enough to remove the polished end and change it to a savage slicer. You'll do this by filing every other tooth and then turning the file around and filing the valleys (gullets) you skipped. On the first pass, only "half-remove" the polished tooth tips. You'll get the rest when you come back on the other side.
WHY WE'RE NAUGHTY: This is not sharpening "by the book". The saw does not wear evenly, and you'll be removing more in the middle 12 or so inches of the blade than elsewhere. Eventually the saw is not going to be perfectly straight anymore. You can't get out of this by counting the strokes and promising to file each tooth the same number of strokes. This is because the file is wearing out as you work. But a little counting discipline helps.
The official way to sharpen a saw by hand requires that you file EVERY tooth. If some teeth are not worn and don't need to be filed to make them sharp, then the official way says, "Get a big flat file or honing stone, and RUIN THEM until all the teeth ARE worn equally. "This will ensure that the saw wears evenly and stays straight," the experts say. So, not only do we have to file every tooth, but we have to make a whole lot of extra work for ourselves. The "Don't-bother-me- this-isn't-my-day-job" philosophy says, Sharpen only the teeth you need to, and get back to work. After several touch-ups, send the saw in for a professional sharpening. For this amount of filing, you won't even need to "set" the teeth, but I'll explain "stetting" just for the record below. There's no mystery here -- if the saw tends to bind, you need to put some more "set" back into the teeth. Rub an old wax candle all over the blade, finish the job anyway, and swear once more you'll send it in for sharpening Real Soon Now. Life goes on.
Rubbing the saw across a concrete sidewalk until the edge is perfectly straight and the teeth are half-gone (OK, I'm exaggerating--you're supposed to use a metal file, but you still kill the teeth) is called "jointing" the saw. There's also a jointing step in the official instructions below.
TOOTH SET IS A SECOND PROBLEM: Besides a slight curve to the saw because the middle teeth got filed down 1/16th inch more than the others (tch, tch), the filing gets you down into the flat part of the steel. It takes away the "set" of the teeth out to the sides. The saw will be sharp but still tend to bind. The kerf is not wide anymore. So, it is nice to have a saw set, a tool that can bend saw teeth a measured amount, preserving both the "set" and the kerf. Now the routine becomes this: observe smoothness of stroke and nothing but "flour" coming out of the kerf, swear up and down you'll send the saws out for sharpening real soon now, set the teeth in the the area that has the most polished tooth tips, then file them.
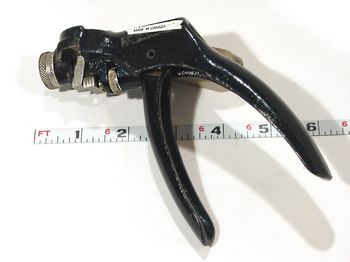
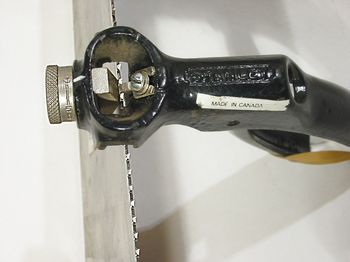
SAW CLAMP & SAW SET:
Click any photo to enlarge.
Click any photo to enlarge.
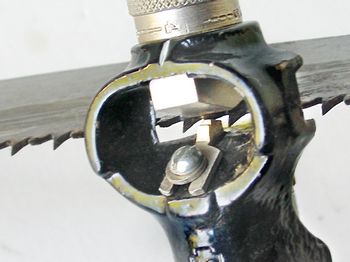
Above are three photos of a saw set. The thin blades of bow saws sometimes just bend flat and need setting, even if never sharpened -- the saw starts to bind when you're out doing garden trimming, and setting the teeth does wonders. Regular saws lose their set gradually, as the teeth get dull and are filed down with repeated sharpening past the point where they had their "set".
---=o=---
First, though, why does anyone care about sharpening a saw? In fact, most people do not. You can see cross-cut hand saws at any yard or estate sale, hanging on the wall, usually the last tool to go.
HAND SAWS CUT STRAIGHT. The advantage and beauty of a hand saw is the enormous width of the blade. The blade guides itself -- it is "self-jigging". You can cut perfectly to a straight line working freehand -- no clamps, just go. At peak performance, a cabinetmaker will razor a cutting line (pencil lines are too wide) and cut right up to the already-sliced wood fibers with 1/64th-inch precision. The other half of the story after self-alignment is sharpness -- the people who leave the used saws hanging may never have enjoyed power-cutting with a sharp saw. As with a chain saw and logs, so it is with a handsaw and carpentry framing (houses) or cabinetwork (furniture): if it makes powder, it's dull; if the sawdust is chips and shavings, it's sharp.
DIRECTORIES: Get your saws professionally done, and let's learn touch-up here. Search under "sharpening services" in a directory like superpages.com, or enter your zip code and "saw sharpening service" into Google's local directory service, then phone one of the hardware and woodworking business that come up, and just ask. Here in Virginia, I use Sure Set Saw, Inc. 1721 South Park Court, Chesapeake, VA 23320, tel 757/420-7991. Bill Fugh's Dad started the business in 1959. If you run into a nail with your best tungsten carbide table saw blade, they can perform miracles with what's left and braze in a new tooth if necessary. A hand saw is $7 (2002). Really, the biggest problem is finding the carton, not the shipping and service cost.
GLUE GUNS: good news, America. The despised Hot Glue Gun that isn't strong enough to hold anything, the glue that cools and hardens before you can get your Act (or anything else) together . . . well, that gun is dynamite for tacking cut-down cartons together. Make your own saw sharpening shipping carton and give the poor hot-stick thing something to live for. (Hot glue also repairs kids sneakers and worn running shoes, but I didn't tell you.)
GETTING STARTED: Saws, remember? Get a triangular file 5 to 7 inches long. If you have to go out and buy one, get several.

Click any photo to
enlarge.
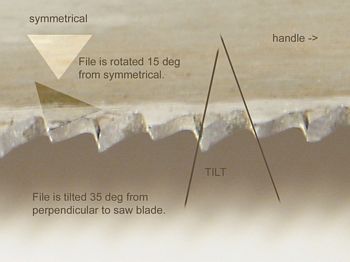
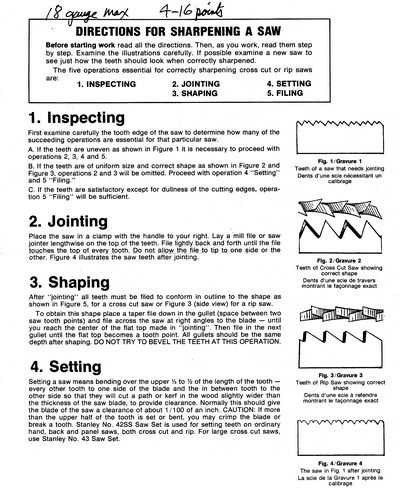
The
profile we want ("Fig. 2", taken from the complete Stanley-Canada
instructions reproduced below) makes two things clear. From the
tooth profile on the bottom, it is clear that the file, which is an
equilateral triangle in cross-section, has been rotated to cut this
pattern. The rotation gives us the "sawtooth" pattern, instead of
a symmetrical triangular wave. The top of the figure implies that
the file was tilted from perpendicular to the blade. In this
drawing, the saw handle is to the left, and the power stroke that does
all the cutting is to the right. (For hacksaws, where you can
choose which way to hang the blade in the frame, people sometimes make
pulling the power stroke -- easier on a thinner blade.)  Click any photo to enlarge.
As the drawing of perfect teeth implied, the file slants across the teeth. In this photo, as with a compass needle pointing us to North, the files are resting in the teeth and freely swinging to the angle that incises those teeth into the metal.
What isn't obvious from looking at the teeth up close is that the triangle file should be held level. These two files just resting in the "front" and in a "back" valley of two teeth are **not** tilted up or down. The saw is perfectly sharpened, because I didn't do it. The files are level. If you have to tilt the file to avoid taking too much metal off the tooth, then the tooth is not set or pointed enough. It should be bent out of the way. Take a another look at the vicious points that do the power stroke in the first drawing.

The files should make a 35deg/55deg angle to the blade (35 + 55 = 90), rather than being perpendicular.

15 DEG ROTATION: Besides the 35 / 55 deg slant away from perpendicular, the file is rotated 15 deg around its own long axis, away from a perfectly symmetrical position. In other words, the top of the triangle is not level, but rotated 15 deg. This gives us that slanted saw tooth look. We get triangles with angles of 75 deg, 45 deg and 60 deg, instead of 60 deg all around (75+45+60=180; 3 x 60 = 180).

Summarizing, the file is stroked horizontally across a vertical saw, along a line of motion tilted 35 deg out of perpendicular, and rotated about 15 deg to fit the sawtooth-shaped tooth profile.
WHEN YOU NEED TO SHARPEN: The sawdust becomes a fine powder, with no chips or curls of wood. The saw sounds and feels different. If you look at the very tips of individual teeth, they are polished. We are talking about areas of metal smaller than the head of a pin here.
POLISHED MEANS DULL: Polished like a mirror means worn out; it means dull for knives, for chisels, for plane irons, for individual teeth on a file, for the edge of a hand cabinet scraper or an old-house-restoration-job paint scraper, for the tips of chain saw cutters and for the very toppy tips of individual teeth on a saw. What's going on here has a lot to do with tomatoes.
Under a scanning electron microscope, a freshly-sharpened cutting edge looks like the edge of a corrugated iron roof, but sliced off very obliquely, so that the length of the roof goes in and out, not just up and down. The corrugations -- not as regular, of coarse -- are the scratches made by the grinding wheel, the file, the honing (bench) stone, whatever was used to sharpen the tool. Provided the steel is hard and brittle enough, and provided the sharpener holds the sharpening angle absolutely constant long enough, a paper-thin edge develops (at the microscopic level, but you can sometimes see it), and ... tah-dah ... breaks off. That leaves the corrugated roof edge. This acts like a saw, and can cut tomato skin. If the knife has a completely straight edge -- any polish at all, no more in/out, up/down saw-like teeth -- the skin can bend out of the way like rubber. The only exception I know among knives are the cleaved glass and diamond knives uses to slice plastic-embedded tissue in electron-microscope labs ('"ultra-microtomes"). Any serrations would look like zebra strips in the final micrographs, so these people just push the knife through the work, and, for them Polish is Good. Woodworkers are all tomato slicers -- we almost never try to just push the cutter through the work, we draw the knife across the wood.
Religious wars in the sharpening debates break out because some few are pushers for polishing (mortise and tenon cutters, the dovetail mob) and the rest of us are slicers.
WHAT YOU NEED TO SHARPEN: File each tooth enough to remove the polished end and change it to a savage slicer. You'll do this by filing every other tooth and then turning the file around and filing the valleys (gullets) you skipped. On the first pass, only "half-remove" the polished tooth tips. You'll get the rest when you come back on the other side.
WHY WE'RE NAUGHTY: This is not sharpening "by the book". The saw does not wear evenly, and you'll be removing more in the middle 12 or so inches of the blade than elsewhere. Eventually the saw is not going to be perfectly straight anymore. You can't get out of this by counting the strokes and promising to file each tooth the same number of strokes. This is because the file is wearing out as you work. But a little counting discipline helps.
The official way to sharpen a saw by hand requires that you file EVERY tooth. If some teeth are not worn and don't need to be filed to make them sharp, then the official way says, "Get a big flat file or honing stone, and RUIN THEM until all the teeth ARE worn equally. "This will ensure that the saw wears evenly and stays straight," the experts say. So, not only do we have to file every tooth, but we have to make a whole lot of extra work for ourselves. The "Don't-bother-me- this-isn't-my-day-job" philosophy says, Sharpen only the teeth you need to, and get back to work. After several touch-ups, send the saw in for a professional sharpening. For this amount of filing, you won't even need to "set" the teeth, but I'll explain "stetting" just for the record below. There's no mystery here -- if the saw tends to bind, you need to put some more "set" back into the teeth. Rub an old wax candle all over the blade, finish the job anyway, and swear once more you'll send it in for sharpening Real Soon Now. Life goes on.
Rubbing the saw across a concrete sidewalk until the edge is perfectly straight and the teeth are half-gone (OK, I'm exaggerating--you're supposed to use a metal file, but you still kill the teeth) is called "jointing" the saw. There's also a jointing step in the official instructions below.
TOOTH SET IS A SECOND PROBLEM: Besides a slight curve to the saw because the middle teeth got filed down 1/16th inch more than the others (tch, tch), the filing gets you down into the flat part of the steel. It takes away the "set" of the teeth out to the sides. The saw will be sharp but still tend to bind. The kerf is not wide anymore. So, it is nice to have a saw set, a tool that can bend saw teeth a measured amount, preserving both the "set" and the kerf. Now the routine becomes this: observe smoothness of stroke and nothing but "flour" coming out of the kerf, swear up and down you'll send the saws out for sharpening real soon now, set the teeth in the the area that has the most polished tooth tips, then file them.
SAW CLAMP & SAW SET:


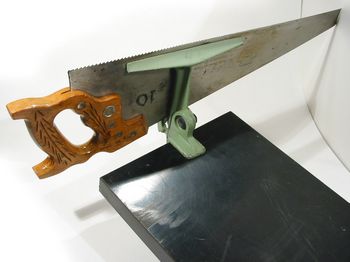
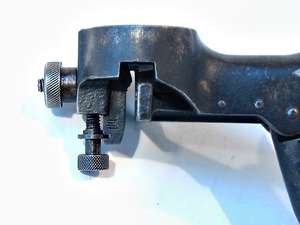
Above, the saw makes horrible
noises
when filed unless securely clamped close to where you are filing. (Yes,
very noisy. Saws are musical instruments in Australian and
Appalachian folk music, but not this way.)
A saw clamp is a faster way to hold and move the saw around than a
carpentry vise, even one with a quick-release lever. As of 2005,
no manufacturers still making saw clamps are known. (OK,
there's
a crummy little aluminum one for Japanese saws.) You and a
sculptor friend who has done bronze casting could fix this
problem. Meanwhile, clamp two boards together and hold the
saw in that. Add cleats along the top edge of the boards for a
better grip right at the edge, and take a minute to trim the boards and
punch in a hole or add a hook and loop of string so you can hang them
up somewhere. You may
need to plane out the middle where your vise will press, so that more
pressure is transmitted to the edges (left and right ends) of the
board. For reasons I can't understand, what you
do today will turn out to be what you live with for the next two
decades.


Click any photo to enlarge.

Above are three photos of a saw set. The thin blades of bow saws sometimes just bend flat and need setting, even if never sharpened -- the saw starts to bind when you're out doing garden trimming, and setting the teeth does wonders. Regular saws lose their set gradually, as the teeth get dull and are filed down with repeated sharpening past the point where they had their "set".
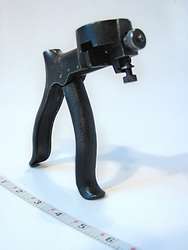
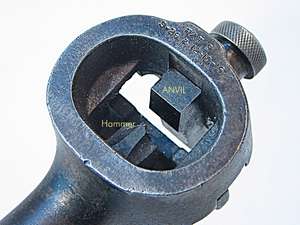
HOW THIS HAND SETTER WORKS:
The punch that comes out and bends a tooth is visible moving upwards
against
the saw. The prominent screw-and-spade-lug are only for circular
saws, to prevent them from sticking up too far because of their
circular shape (convexity). The knurled knob at the very
top moves an anvil up and down. The punch bends the tooth against
this angled anvil. The anvil's angle is the "crease point" where a
tooth is bent (set). If the anvil is lowered away from our
viewpoint and deeper down from the edge of the saw into the body of its
blade, then the crease point is lowered and more of the tooth is
bent -- the set is greater. The anvil is visible above the blade;
its top has caught the light and is bright white.
IMPROVISING -- DON'T SAY I TOLD YOU. To improvise a tooth set, you can lay a saw down on a pine board, move a nail set from tooth to tooth, and whack it. The pine gives and the teeth bend. This can get you out of a bind (sorry), but the teeth are never equally set. The ones sticking out more scratch the wood as you cut. The rough face of any cut will not be smooth enough to be left on display without some touch-up with a plane. If the surface were going to be glued, one could argue that the scratch-up from irregular teeth make for a **stronger** glue joint, not just a higher slob factor around the workshop. The "by the book" way would have a perfectly even set to begin with, because a setting tool was used. Then, in one premeditated stroke, you would run a fine file or a flat honing stone (bench stone) across the sharpened teeth (OUCH!!), on their flanks, not the tops. This knocks down any residual irregularity in a tool-done-set that was almost perfect anyway, and will make your cuts super clean. Today, people who care that much buy table saws and tungsten carbide blades with laser-cut slots to absorb the thermal expansion, and diamond-wheel-polished teeth.
P.S. We all have plenty of funny little saws that aren't straight anyway, and don't need to cut smoothly (curved garden pruning saws) or cut with any kerf at all (veneer saws). You don't need to feel guilty about not jointing a saw that's curved to begin with, or not putting a set into teeth that aren't supposed to have any (veneer saw). Buy some little triangle files in a couple sizes and just do it. Start here.
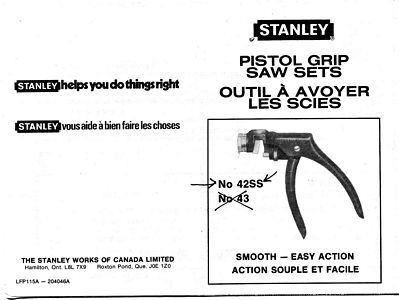
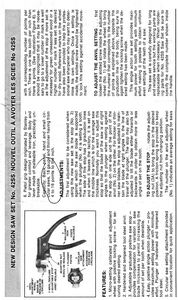
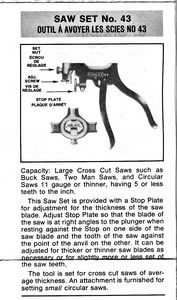
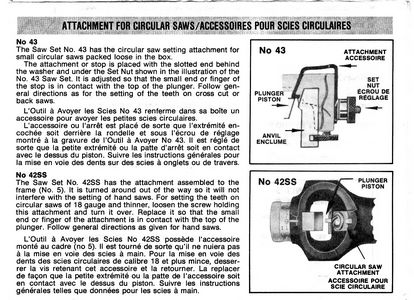
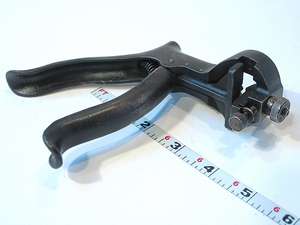
The above photos were a Stanley No. 42 saw set. Below are photos of what became the No. 43, an older model originally patented in 1916, a golden growth period in the history of Stanley Rule and Level Company and the Stanley Works.
Click any photo to enlarge.
IMPROVISING -- DON'T SAY I TOLD YOU. To improvise a tooth set, you can lay a saw down on a pine board, move a nail set from tooth to tooth, and whack it. The pine gives and the teeth bend. This can get you out of a bind (sorry), but the teeth are never equally set. The ones sticking out more scratch the wood as you cut. The rough face of any cut will not be smooth enough to be left on display without some touch-up with a plane. If the surface were going to be glued, one could argue that the scratch-up from irregular teeth make for a **stronger** glue joint, not just a higher slob factor around the workshop. The "by the book" way would have a perfectly even set to begin with, because a setting tool was used. Then, in one premeditated stroke, you would run a fine file or a flat honing stone (bench stone) across the sharpened teeth (OUCH!!), on their flanks, not the tops. This knocks down any residual irregularity in a tool-done-set that was almost perfect anyway, and will make your cuts super clean. Today, people who care that much buy table saws and tungsten carbide blades with laser-cut slots to absorb the thermal expansion, and diamond-wheel-polished teeth.
P.S. We all have plenty of funny little saws that aren't straight anyway, and don't need to cut smoothly (curved garden pruning saws) or cut with any kerf at all (veneer saws). You don't need to feel guilty about not jointing a saw that's curved to begin with, or not putting a set into teeth that aren't supposed to have any (veneer saw). Buy some little triangle files in a couple sizes and just do it. Start here.
The above photos were a Stanley No. 42 saw set. Below are photos of what became the No. 43, an older model originally patented in 1916, a golden growth period in the history of Stanley Rule and Level Company and the Stanley Works.


Click any photo to enlarge.


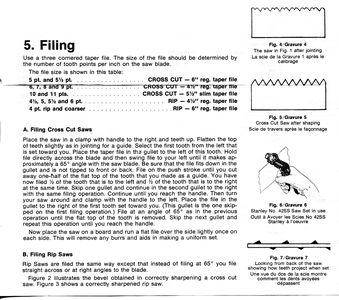
OFFICIAL INSTRUCTIONS FROM
STANLEY-CANADA
Click
each photo to enlarge, then print out from browser.


--end